
How To Paint Kitchen Cabinets White On A Budget
Looking to learn how to paint kitchen cabinets white yourself? This is a great DIY project that will completely transform your home.
Are you interested in learning how to paint kitchen cabinets white? There are many reasons why you may want to do this.
You may have just bought a new home and the kitchen is dated. As much as you’d LOVE to do a complete remodel it may not be in the budget right now.
That said a great way to update your kitchen and get a new look is by painting your cabinets white. Changing the cabinet color and updating the handles and knobs is an inexpensive way to upgrade your home.
If you have it in the budget a new backsplash and countertop would also make a dramatic difference. Whatever your situation may this post will teach you how to paint kitchen cabinets white on a budget.
All you need is time and patience to complete this DIY project. A helpful friend to help you would be fabulous as well. Just saying!
This post is all about how to paint kitchen cabinets white.
READ MORE>>> Home Design Inspiration On Inspired Design Talk

Supplies For How To Paint Kitchen Cabinets White
As with any DIY project the most important thing is having the supplies to get the job done. This may seem like a long list but you will be able to use these supplies in future projects as well.
You may already have some of these in which case no need to purchase. This list has everything I used so you can pull everything together before you start.
In my experience, it’s better to have all supplies on-site and return whatever I don’t need. That way I can continue the flow of the project without having to stop in between.
This post may contain affiliate links, which means that if you make a purchase, I might make a small commission at no extra charge to you. Please read my full disclosure here. As an Amazon Associate, I earn from qualifying purchases.
Here is the (how to paint kitchen cabinets white) supply list:
- 320 grit sandpaper
- 120 Grit Fine Block Sanding Sponge
- 9 Ft x 12 Ft Heavy Duty Canvas Drop Cloth
- Plastic Drop Cloth
- 6 ft Folding Table
- Scrub Sponge
- Tack cloth
- Rosin paper
- Disposable Nitrile Gloves
- Dirtex Cleaner
- Utility Knife
- Screwdriver Set
- Sandwich Bags
- Purdy Angular Trim Paint Brush, 2 inch
- Mini Paint Roller with Frame
- Primer sealer
- Painter’s tape
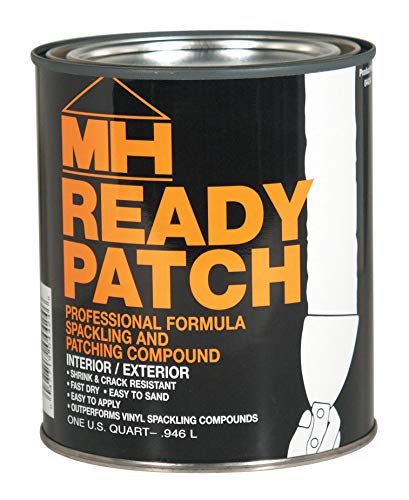
- Ready Patch Spackling and Patching Compound
- Putty Knife
- BM ADVANCE Cabinet Paint – Satin Finish
- White Contact Paper Peel and Stick
- Cabinet Door Bumpers
- Under Sink Mat Liner
- Ribbed Shelf Liner

How To Paint Kitchen Cabinets White In 12 Easy Steps
Here is the rundown of the 12 easy steps:
- Remove Cabinet Doors, Drawers and Pulls
- Clean the Cabinets
- Repair Holes, Dents or Gouges
- Sand Then Clean the Surfaces
- Tape Off Cabinets
- Prime The Cabinets
- First Coat Satin Finish
- Second Coat Satin Finish
- Apply Vinyl At Sides
- Apply The Hardware
- Add Cabinet Bumpers
- Line Inside Cabinets
Next, we’ll get into the details of each step. This project does require elbow grease and hard work but the end result is a gorgeous kitchen at a fraction of the price.
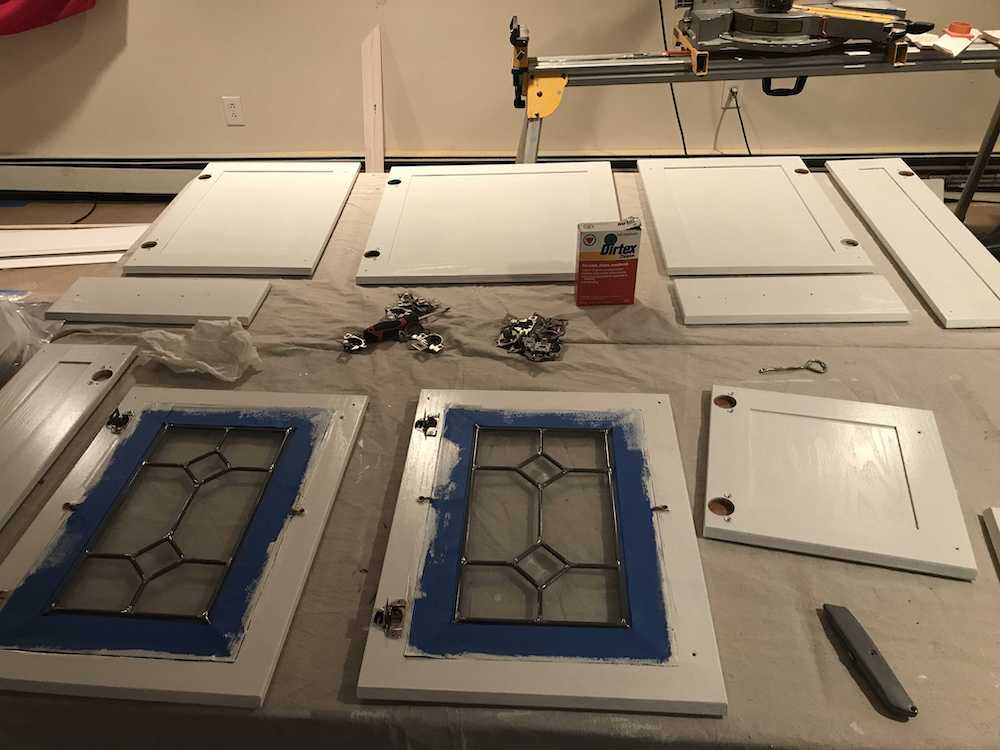
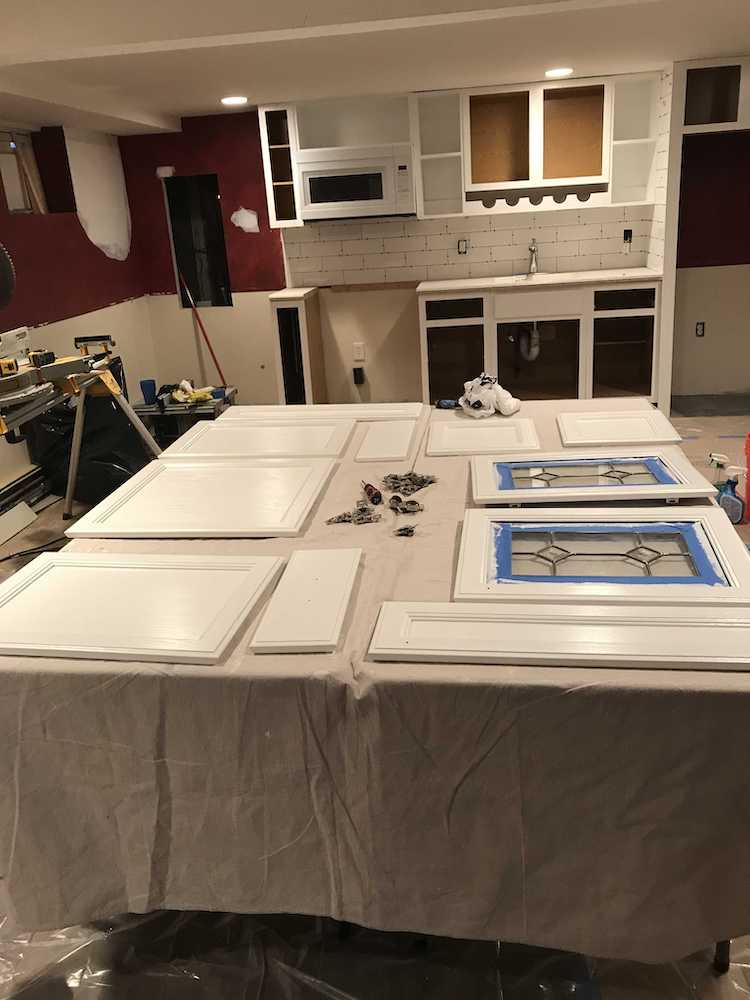
1. Remove Cabinet Doors, Drawers and Pulls
Remove the cabinet doors, drawers, and all pulls, knobs, latches, and other hardware from these parts. Place the hardware and screws in plastic bags where they will be easy to locate when you’re ready to reassemble.

Place the drawers of the cabinets on a table lined with a drop cloth in the order that they get removed. This will make putting them back easier.
Don’t mix them up or the hinges may not line up properly when you reinstall them.

Protect the countertops with a drop cloth or rosin paper.
Pro Tip: Remove the draw fronts so they can be painted flat.
2. Clean the Cabinets
Grease and Grime build up over time so your cabinets MUST be cleaned. Even if they look clean do NOT skip this step.
Following the instructions on the box, mix Dirtex Cleaner with water. Wear gloves to protect your hands. Sponge the mixture on both sides of the cabinets and wipe off with a clean cloth.

Scrape off the old Cabinet Door Bumpers during this step as well. You will reapply new ones once the cabinets are finished.
3. Repair Holes, Dents or Gouges
If your cabinets have any holes or gouges you will need to fill them. If you plan on using new hardware that is a different size than the original, you will have to fill the old hardware holes before painting.
Use the Ready Patch Spackling and Patching Compound to fill the holes using a Putty Knife. Allow the product to harden and dry completely before moving to the next step.
This product is fabulous and will be used over and over. It’s great for patching up dings and dents in wood and other surfaces. I’m obsessed with how easy it is to use and how quickly it dries.
This product is essential for any homeowner in my opinion.
4. Sand Then Clean the Surfaces
Use sandpaper or a sanding sponge to smooth out the surface of the cabinets. You don’t need to sand to the bare wood just lightly sand so the paint will adhere.
Be sure to sand over shiny areas to deglaze the previous finish. Stubborn finishes may require rubbing with denatured alcohol and fine steel wool.

Use a Shop Vacuum to remove the sanding dust from all surfaces. Wipe down the areas to be painted with a tack cloth to pick up any remaining sanding residue.
5. Tape Off Cabinets
You don’t need to sand and paint the inside of the cabinets. Mask off the interiors with painters’ tape for a clean finish and sand only the front surfaces and visible edges of the cabinet face frames.

If you have glass-front cabinets tape off around the glass so the paint doesn’t get on it.
6. Prime The Cabinets
Now the fun part! Let’s get painting.
Start with the backs first. Use a 2-3 inch Purdy angular brush to apply an even coat of primer to all surfaces to ensure a well-bonded finish coat. Brush to cut in and mini roll out the rest. Priming the cabinets reduces the need to sand and deglaze old finishes before repainting.
Another advantage to a primer is that it provides a good base for satin, water-based paint.
High-gloss enamel paint was once the preferred finish for kitchen cabinets because it resists stains and water and is easily cleaned. Today’s water-based finishes are easier to work with and provide an equally durable finish.

When priming the cabinets remember this is just the first coat. This coat will not be pretty. You may be tempted to make the primed first coat have full coverage but this is not necessary.

After the backs are dry flip the cabinet doors and paint the fronts and sides.
You can push thumbtacks in the back to flip the cabinets sooner but only if they push in. Some cabinets are hard and the push pin method won’t work.

7. First Coat Satin Finish
Once the primer coat is dry it’s time for the first coat of the satin finish paint. Again start with the backs first then flip to the front. To save on time I recommend two coats to the back first before flipping to paint the sides and fronts.
The advance paint recommends a drying time of 24 hrs between coats but by doing the backs first you can paint the second coat sooner in my experience. If you like to follow the rules wait 24 hours between coats.

BM ADVANCE Cabinet Paint – Satin Finish in Chantilly Lace OC-65 was used here which is a true bright white. The walls are painted in Simply White OC-117 in an eggshell finish.
For bedrooms use matte for high-traffic areas use eggshell finish so you can wipe the walls.
Painting the backs of the cabinets, then the sides, and finally the fronts will allow you to work quickly in the less critical areas. Then you can see and correct any drips or smudges on the most visible areas.
Do not allow the paint to accumulate in any crevices and corners. This will create a professional finish.
Next, paint the cabinet box fronts. Use the roller for a smooth finish. If you need to use the brush you can roll over the areas after for a smooth even finish.
Always apply paint in thin, light coats, covering all areas. Thin coats will leave less visible brushstrokes and will dry quicker. Be on the lookout for drips and smooth them out ASAP.
Allow cabinets to dry overnight.
8. Second Coat Satin Finish
Allow the paint to dry for at least four hours between coats. You can lightly sand all surfaces before the second coat.

Two coats of quality paint are usually enough but you may want to add a third coat on the face and sides. Kitchen cabinets take a beating so they need all the protection they can get.
Allow cabinets to dry overnight between 2nd and 3rd coats.
If possible allow cabinets to cure for 5-7 days before use.


9. Apply Vinyl At Sides
If the sides of your cabinet boxes look like they won’t hold the paint well use vinyl instead. These cabinets were in bad shape so white vinyl was applied instead of paint.


The inside cabinet box and shelf of the glass cabinets were also lined with vinyl.

10. Apply The Hardware
For a different look, you can purchase new handles and pulls. If it is not in your budget clean your old pulls well before reapplying.


Pulls can also be sprayed or refinished using rub and buff.

Gold leaf was used on the sides of these pulls and the face of the knobs. Since they get a lot of use they were only partially refinished to update the look.


11. Add Cabinet Bumpers
Once your cabinets have completely dried apply new Cabinet Door Bumpers to the corners at the top and bottom. This will prevent your doors from slamming. Don’t forget to apply new bumpers to your drawer fronts as well.


12. Line Inside Cabinets
To protect the bottom of your cabinets or shelves it is a good idea to line them. You can use the Under Sink Mat Liner for your sink cabinet.
For inside the cabinets and open shelves use a Ribbed Shelf Liner to protect from grime and spills.

You can see here the shelf, inside sides, and back are all lined in white vinyl.
Before And After Kitchen
This project was quite the transformation. I don’t think anyone thought the original cabinets could be restored to look this good. Just goes to show you what a little paint, sweat, hard work, and determination can accomplish.
I hope this information gave you ideas and inspiration to start your design project. Let me know how it goes!
This post is all about how to paint kitchen cabinets white.
Other Posts You’ll Love:
- 5 Best Grout Colors For Subway Tile
- White Subway Tile Dye Lot Color Variations
- How To Apply Vinyl Decals Like A Pro In 9 Easy Steps
Last Updated on August 15, 2024 by Nicole DelaCruz


